Join An Organization: Overview
To join an organization, as well as our signup process itself, is easy. It includes several steps to ensure security and privacy for users and the organizations. PubSafe is the only platform for NGOs and businesses that enables a user to participate in multiple organizations for a single price. This includes sharing information with organizations and quickly toggling between them using our mobile app. Users are always in charge of privacy and data sharing rules.
Summary of Steps to Adding Members
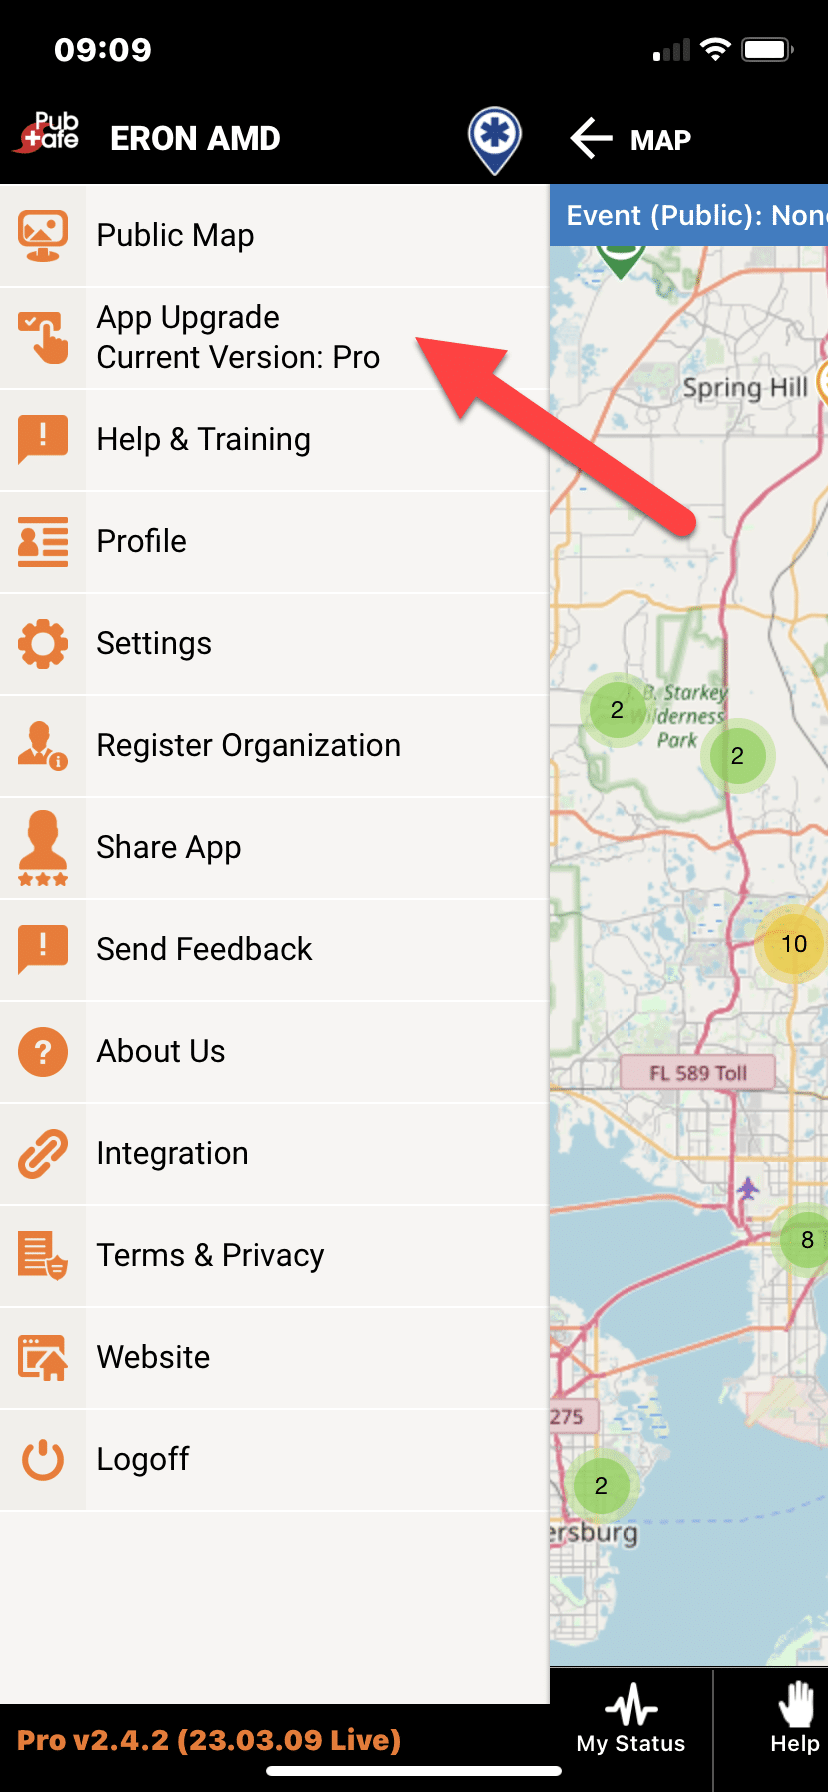
1. The free PubSafe mobile app is installed from the respective app store for Apple or Android. The app provides the option for upgrading to the Pro version to enable joining organizations or to register a new organization for portal access. The registration includes a 90-day free trial. [Use the top left settings menu in the app, App Upgrade].
View details
2. An organization must be registered and approved. The org creator is the account owner and can invite other members to join and assign them roles in the portal.
View details
3. The organization sends invitations to potential members using email, SMS or a QR code.
View details
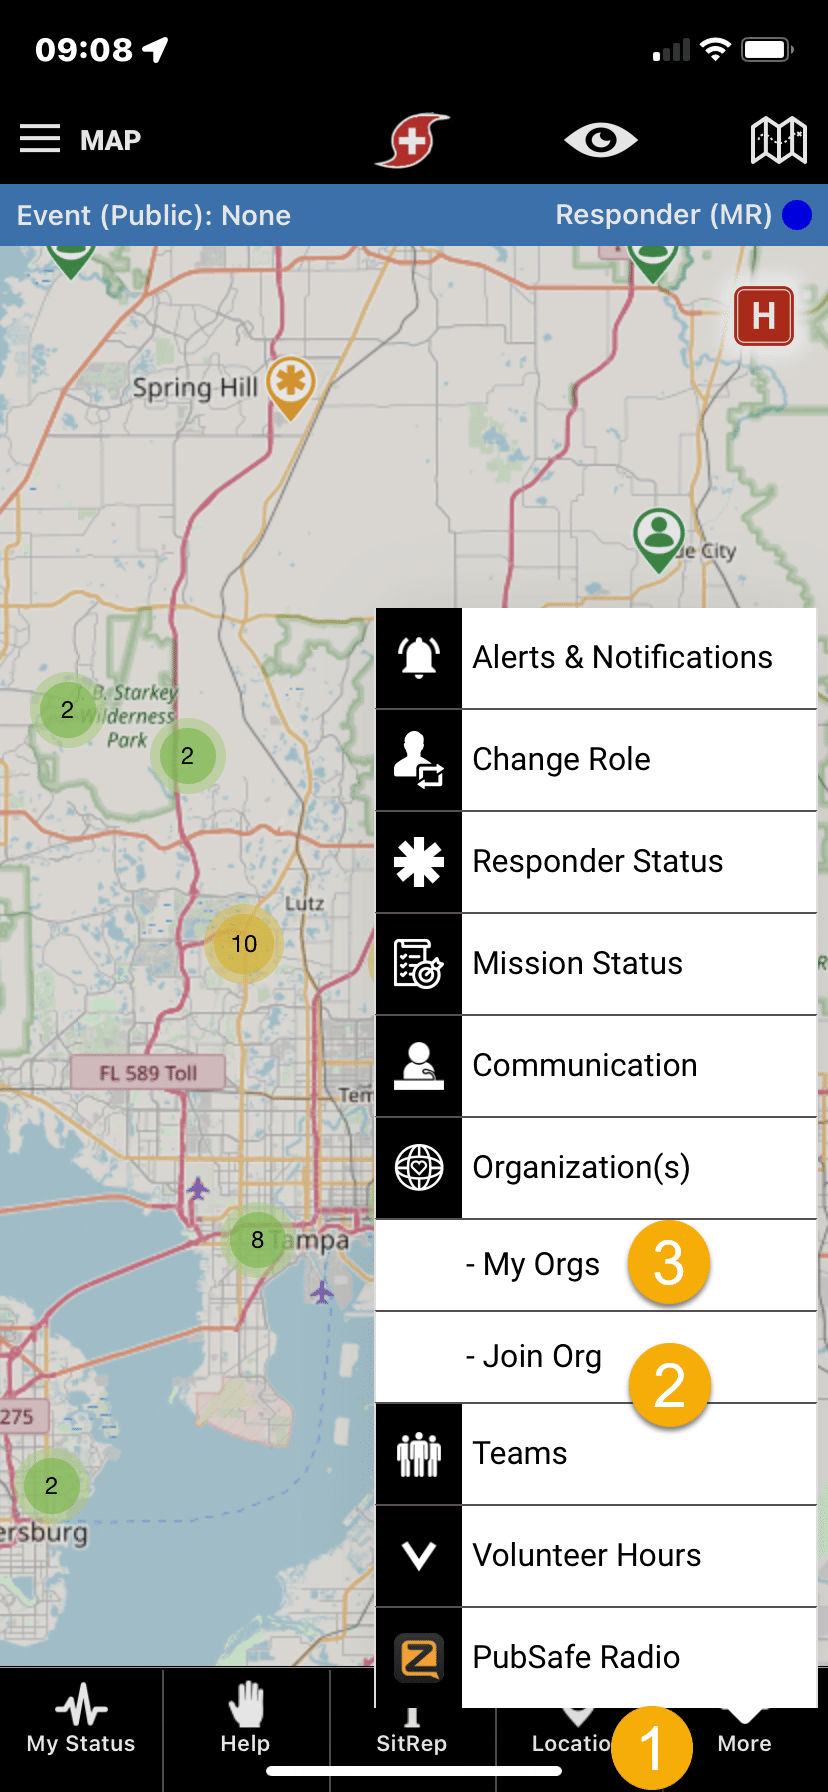
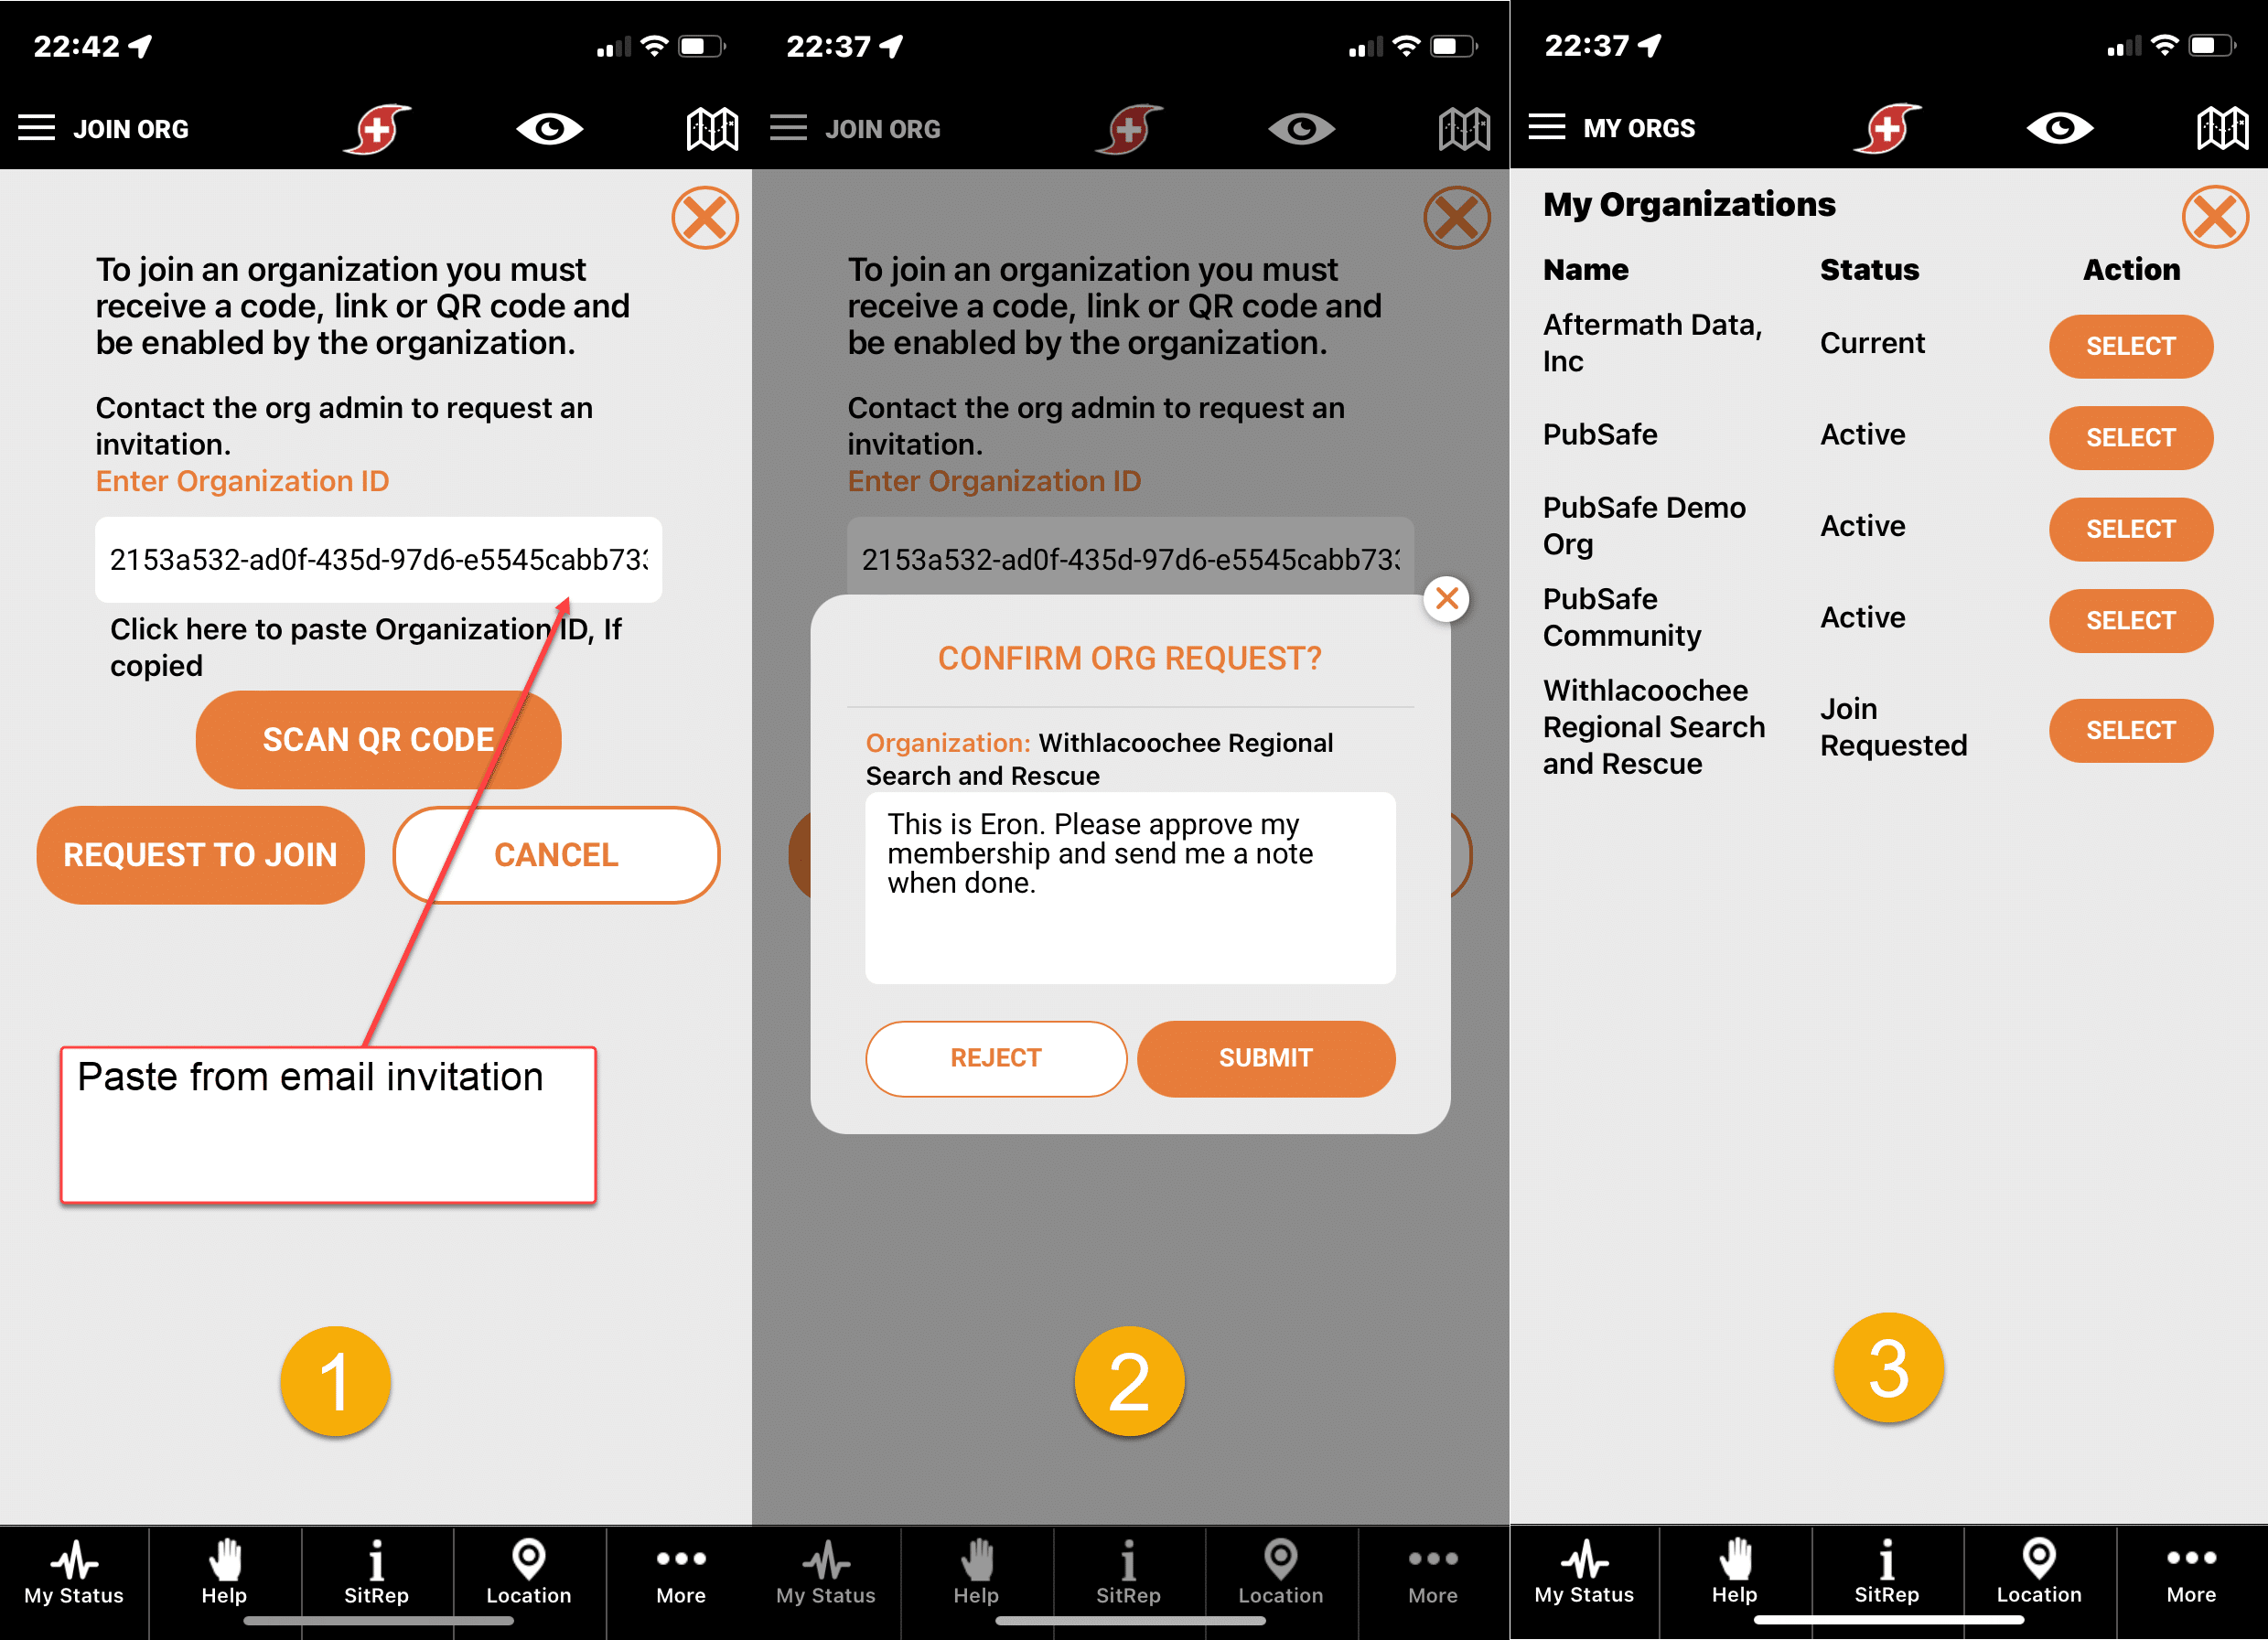
4. Users who receive the invitation must accept the invitation. [#2 in the image]
View details
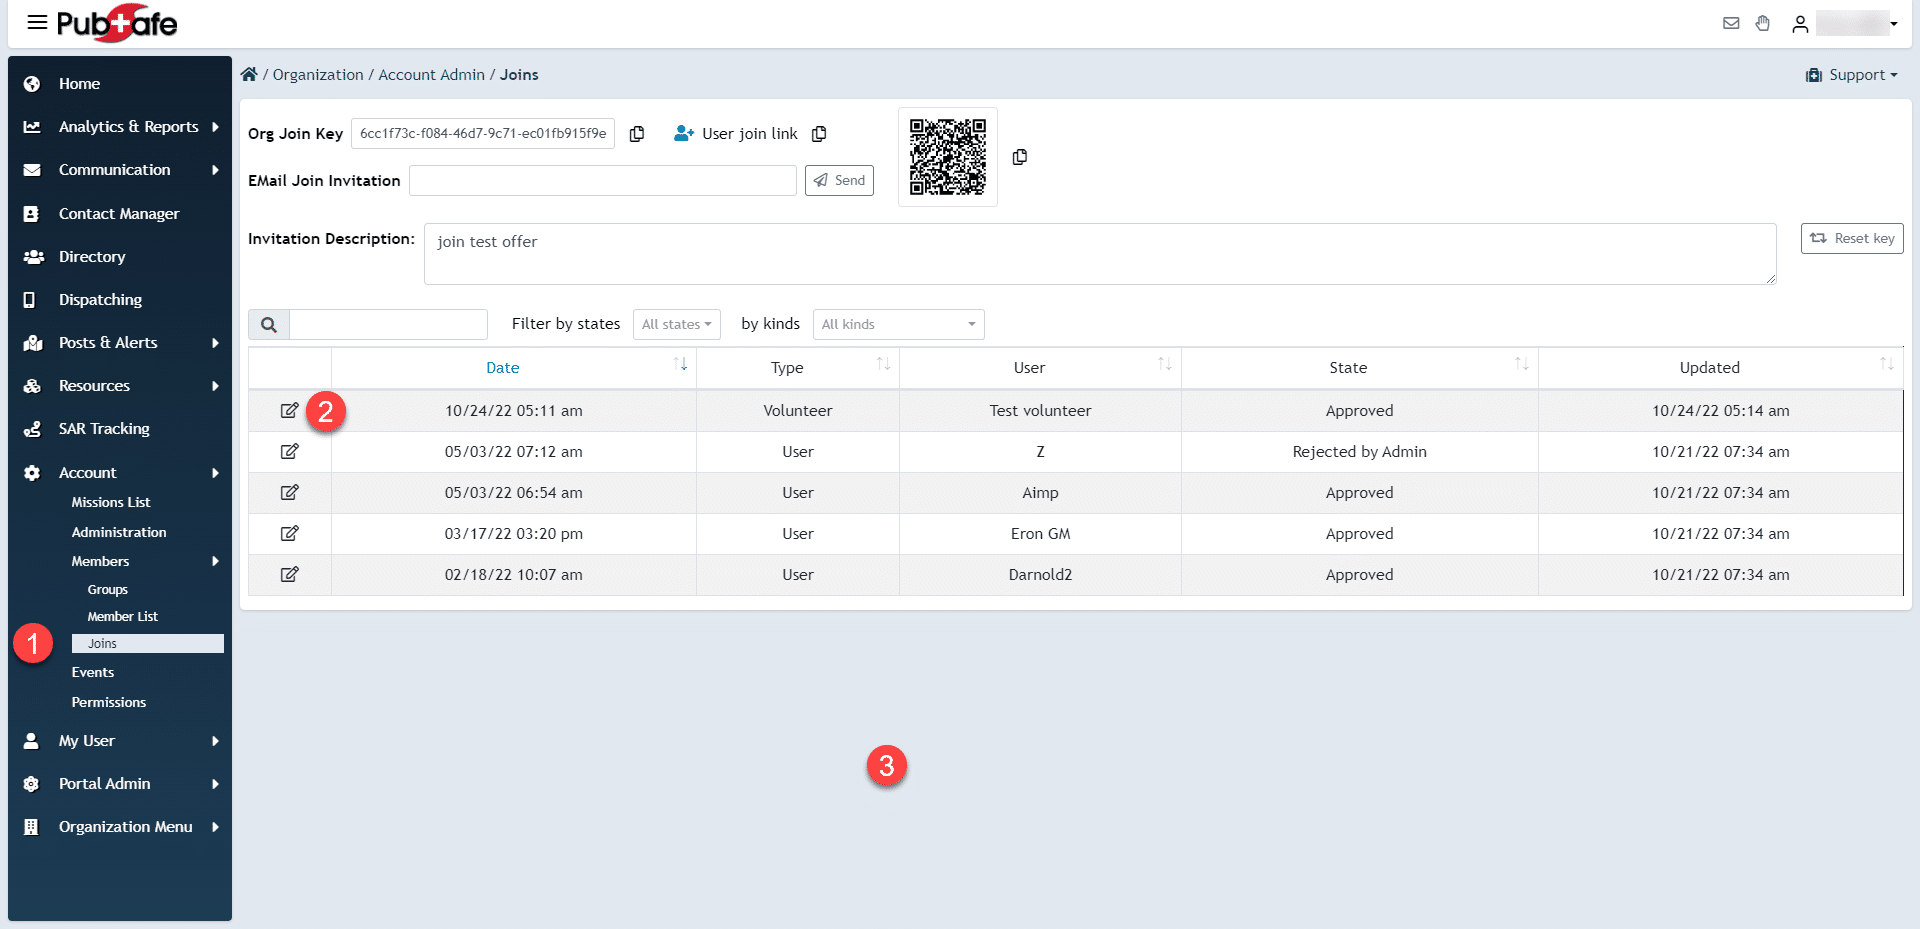
5. The organization must to make final approval of users who have accepted the invitation. Once a user is approved they can use the app or log into the PubSafe portal using their mobile app credentials.
View details
6. User must then select their active organization. [#3 in the image]
View details
Detailed Steps
Step 1 – Install and Setup PubSafe Mobile App
1. The first step is to install the PubSafe mobile app. For users the joining an organization, an option is provided to upgrade to the Pro version. [Use the top left settings menu in the app, App Upgrade].
Upgrading to the Pro App
After installing the free version of PubSafe, click on the Admin menu in the top left corner (3 bars). Click on App Version. Scroll down and select Pro version.
Optional Next Step After Upgrading to Pro
Your status can toggled between Citizen and Responder role by touching MORE in the lower right corner and selected the desired role. Most organization members will choose Responder status. The first time Responder status is selected, additional information is requested to allow categorizing a responders available resources.
Note: The header bar will be blue in a Responder role or green in a Citizen role.
Your organization can now track and communicate with you in new ways from the web portal.
Step 2 – Registering an Org for Portal Access
2. To join an organization, the organization registration process must be completed and approved. The organization creator is the account owner and can invite other members to join and assign them roles in the portal.
Step 3 – Send Invitations to Join the Org
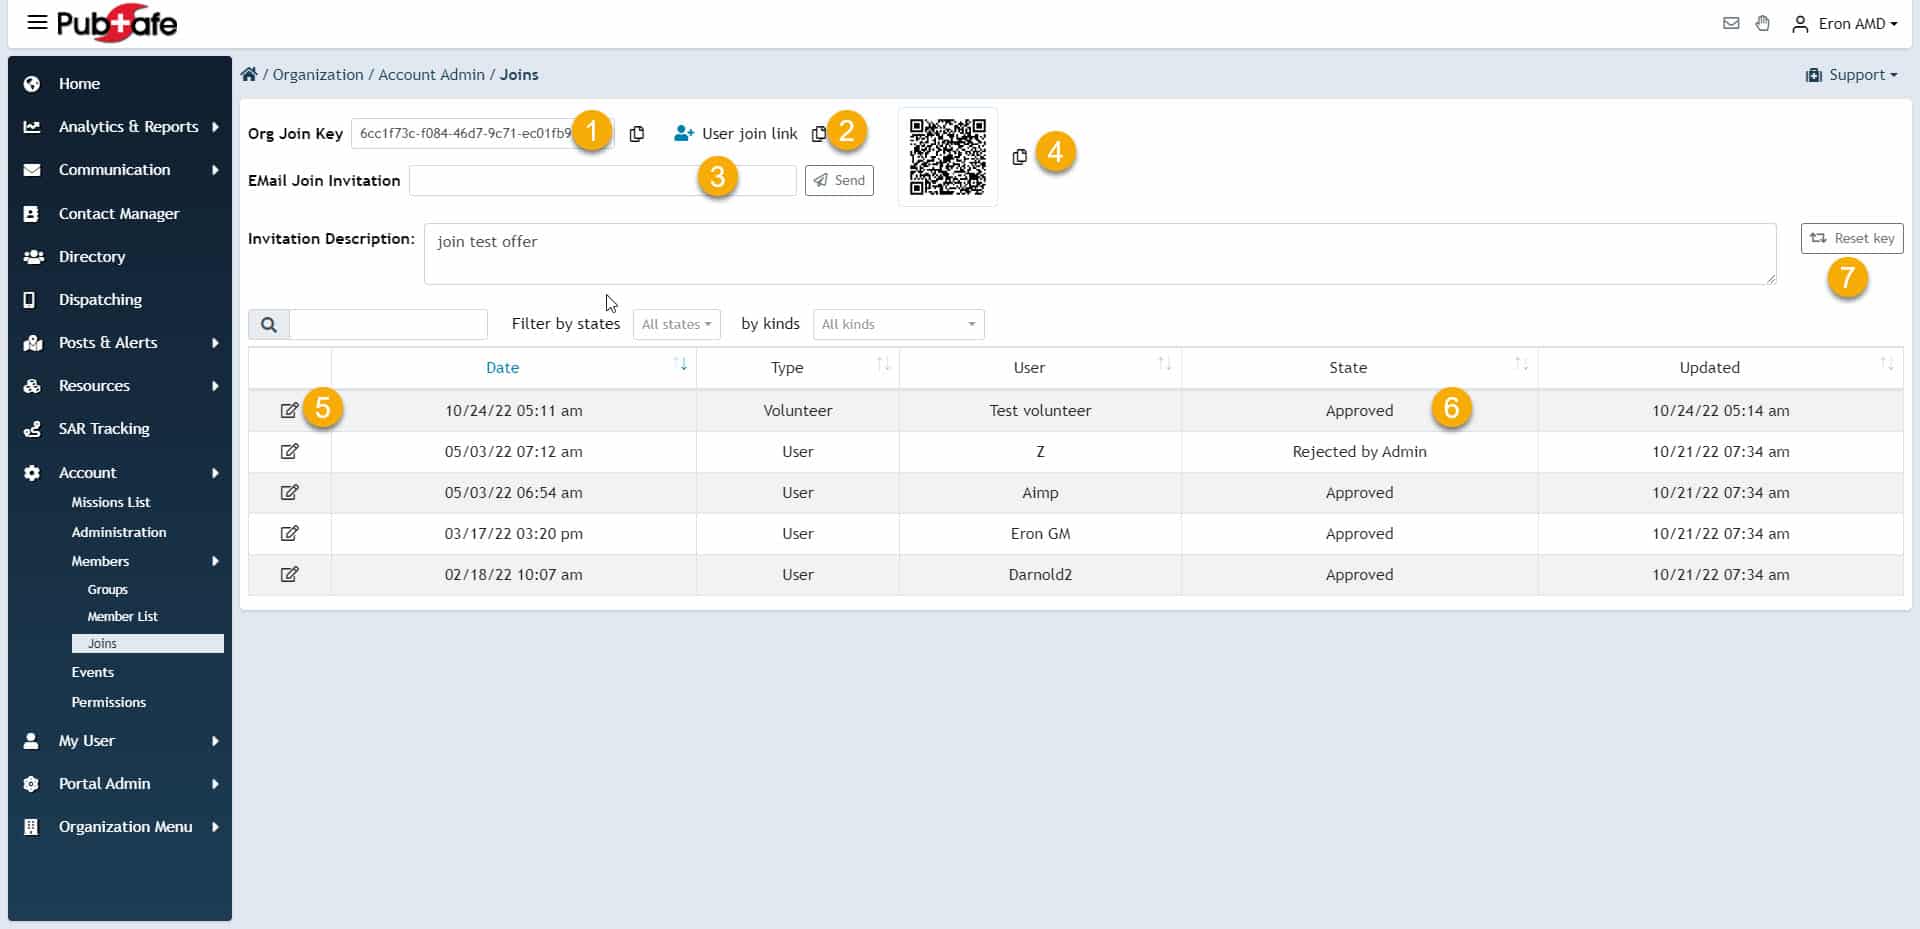
Organization send invitations to members using email, SMS (cell text) or a QR code. This step is only needed if an organization has not yet been registered and approved. Click here to register an organization. After the organization is approved, login using the same credentials used to log into the PubSafe mobile app. Click on the image below to view the referenced numbers.
Sending Invitations
There are four options for sending users an organization invitation to join. Select the the best method for your situation.
Note: Ensure the user has upgrade to the Pro version prior to sending if possible.
1. Copy and send the organization key. This is the least preferred method but it can be used to share in a chat group or put into an SMS message.
2. Copy a hyperlink which the user can click if the PubSafe app is already installed.
3. Email the user directly from the PubSafe portal.
Note: Every organization gets a custom link to share which is used to sign-up or onboard people. These users are automatically put into the Contact Manager menu. The contact information can be used to send invitations to join the organization.
Image 1
Step 4 – Accepting an Invitation to Join an Org
Once a user receives an invitation, they must be accepted it. This changes the users status in the web portal. A portal admin must complete final approval. #5 and #6 above.
Accepting the Invitation
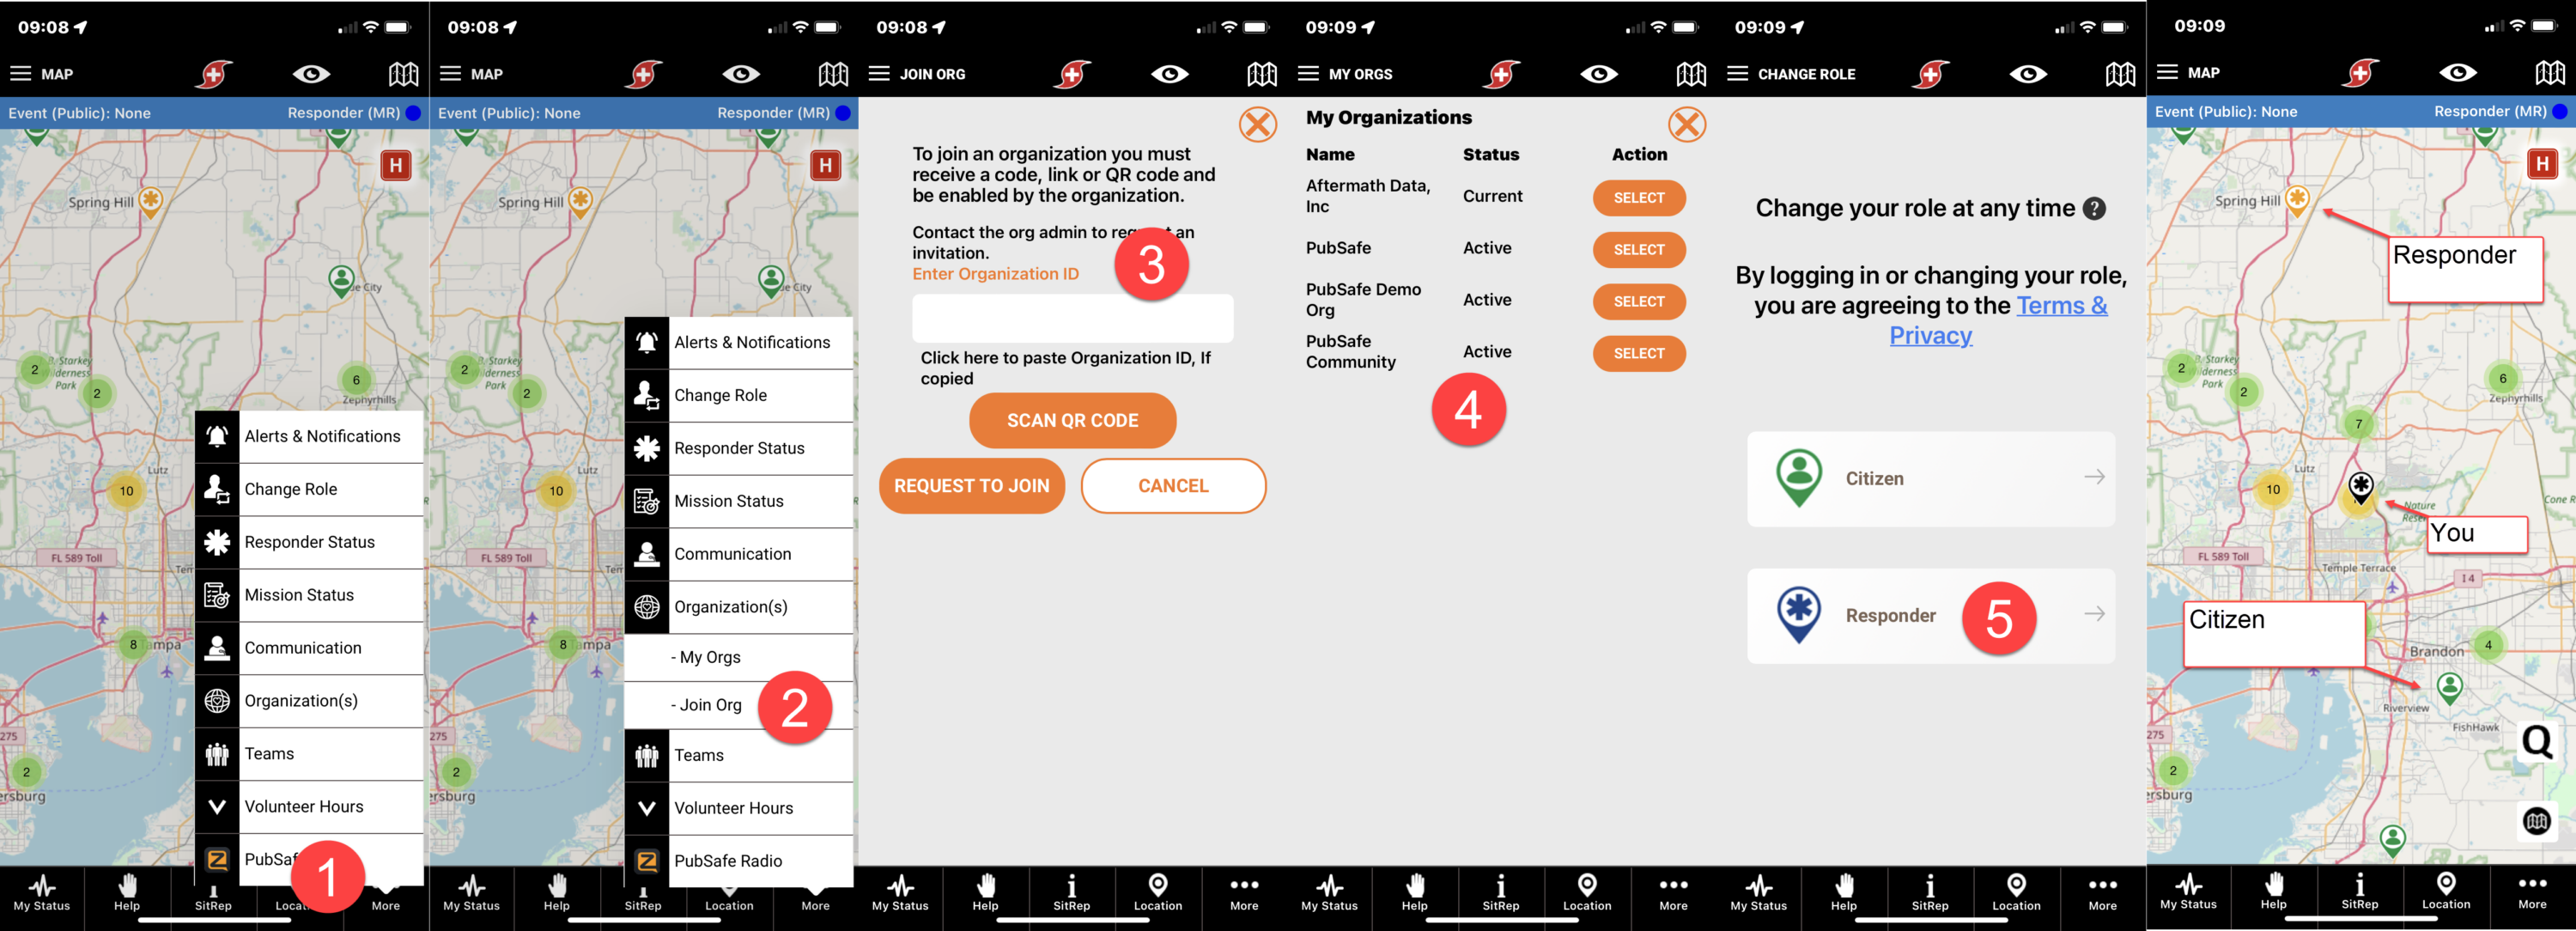
After you install the free PubSafe app and upgrade to Pro, you can join an organization several different ways. You can join from a hyperlink, copy and paste a code, or scan a QR code. Click the image below to see the steps in the PubSafe mobile app.
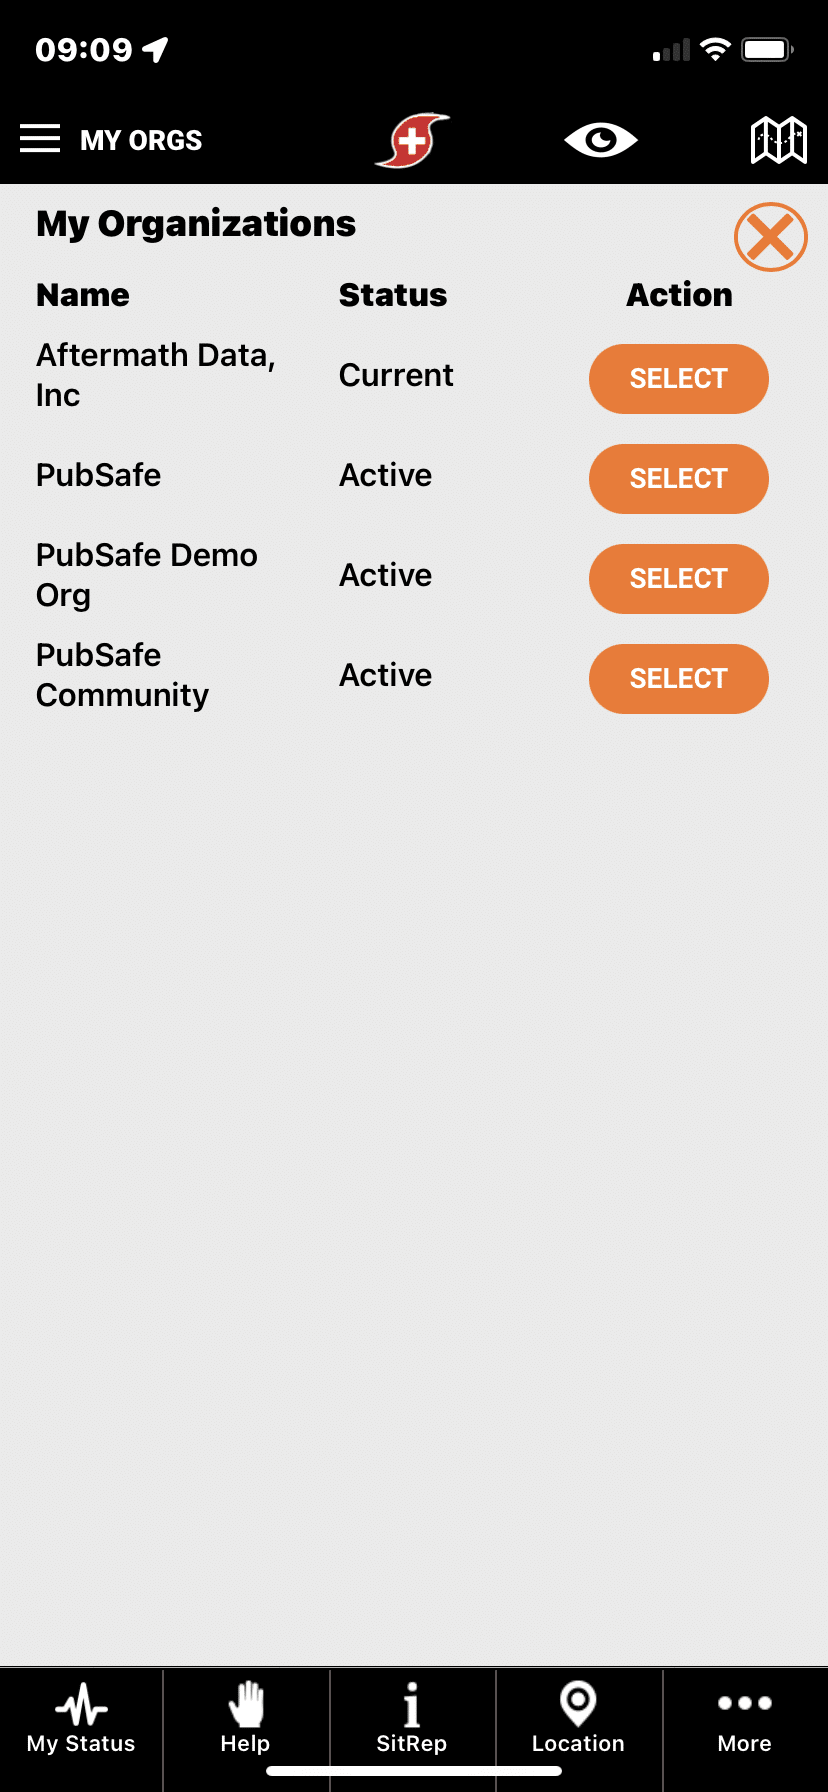
You will see a list of your organizations in the app as seen in #4. You can switch between several organizations which changes who can see you and who you can share with. It enables members to use PubSafe for multiple organizations without logging in and out all the time.
After you accept the invitation, the organization that sent you the invitation must complete final approval. As a member of an org, the org can see your location, dispatch missions to you if you are in the role of a Responder and in mission ready status, include you in org messaging, and track your movements for the last 96 hours. You can change your visibility options anytime by clicking on the eyeball icon at the top. User privacy settings override all other privacy.
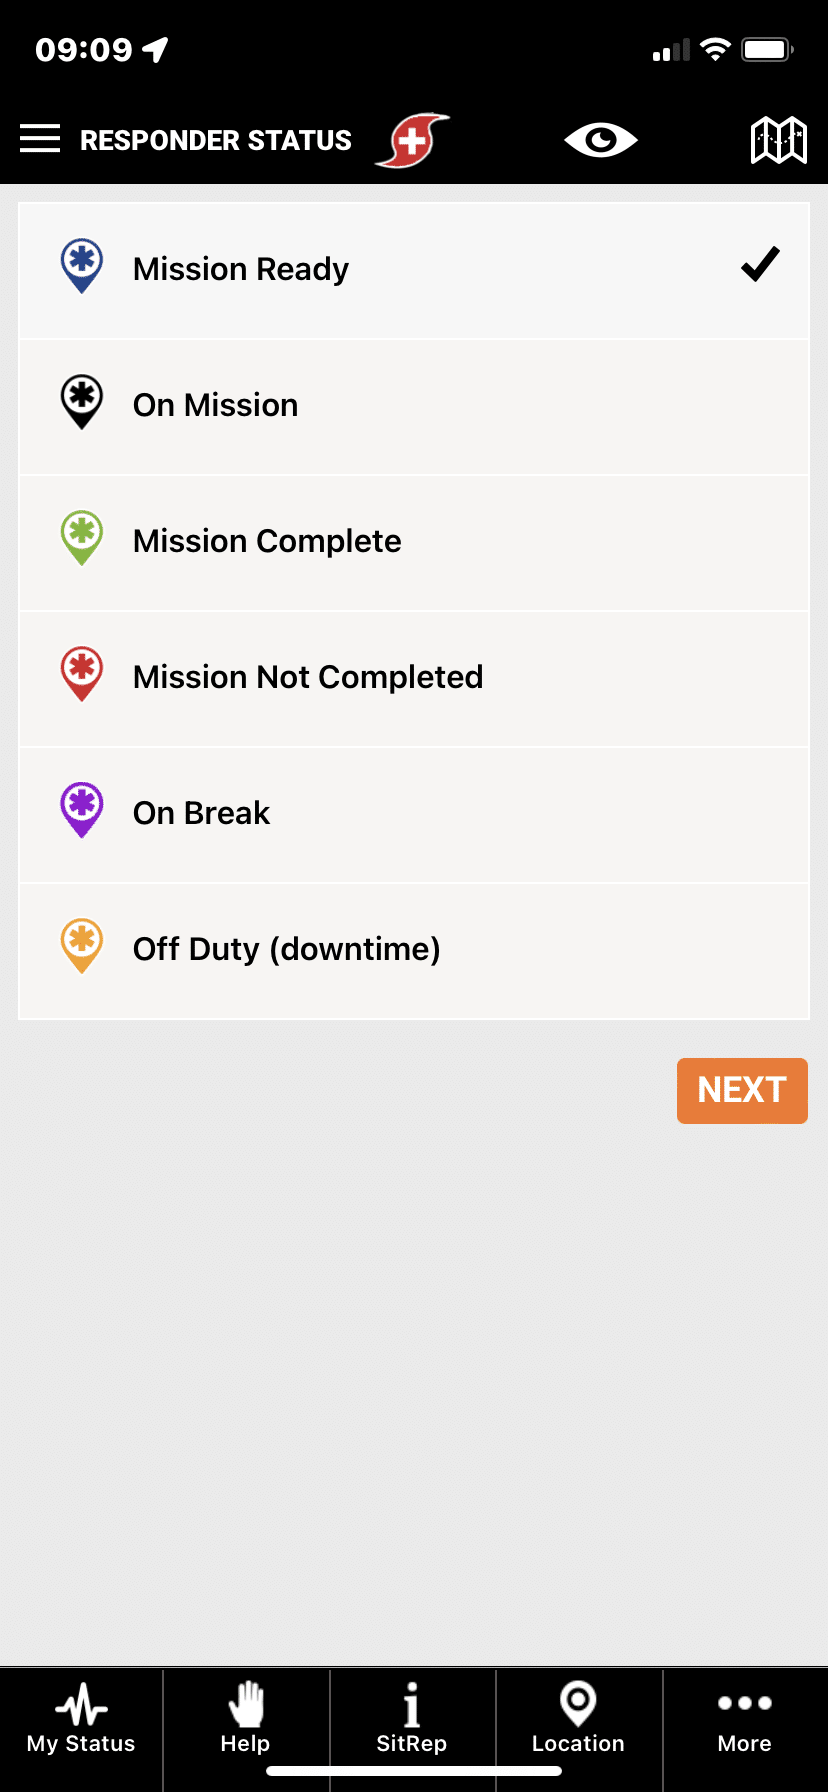
As seen in #5, you can change your role from Citizen to Responder, and back at any time. As a Responder you can change your Mission Status at any time to communicate with dispatch your availability to run missions to assistance requests.
Joining an Org & Changing to Responder Role
Image 2
Copy and Paste Org Code from Email, SMS or QR Code
Image 2-a
Step 5 – Accepting an Invitation to Join an Org
Once a PubSafe mobile Pro app user receives an invitation, it is accepted by the user. This changes the user’s status displayed in the web portal. A organization administrator then completes final approval step as outlined previously in #5 and #6 in Image 1 above.
Accepting the Invitation
After you install the free PubSafe app and upgrade to Pro, you can join an organization several different ways. You can join from a hyperlink, copy and paste a code, or scan a QR code. Click the image below to see the steps in the PubSafe mobile app.
You will see a list of your organizations in the app as seen in #4. You can switch between several organizations which changes who can see you and who you can share with. It enables members to use PubSafe for multiple organizations without logging in and out all the time.
After you accept the invitation, the organization that sent you the invitation must complete final approval. As a member of an org, the org can see your location, dispatch missions to you if you are in the role of a Responder and in mission ready status, include you in org messaging, and track your movements for the last 96 hours. You can change your visibility options anytime by clicking on the eyeball icon at the top. User privacy settings override all other privacy.
As seen in #5, you can change your role from Citizen to Responder, and back at any time. As a Responder you can change your Mission Status at any time to communicate with dispatch your availability to run missions to assistance requests.
Image 3
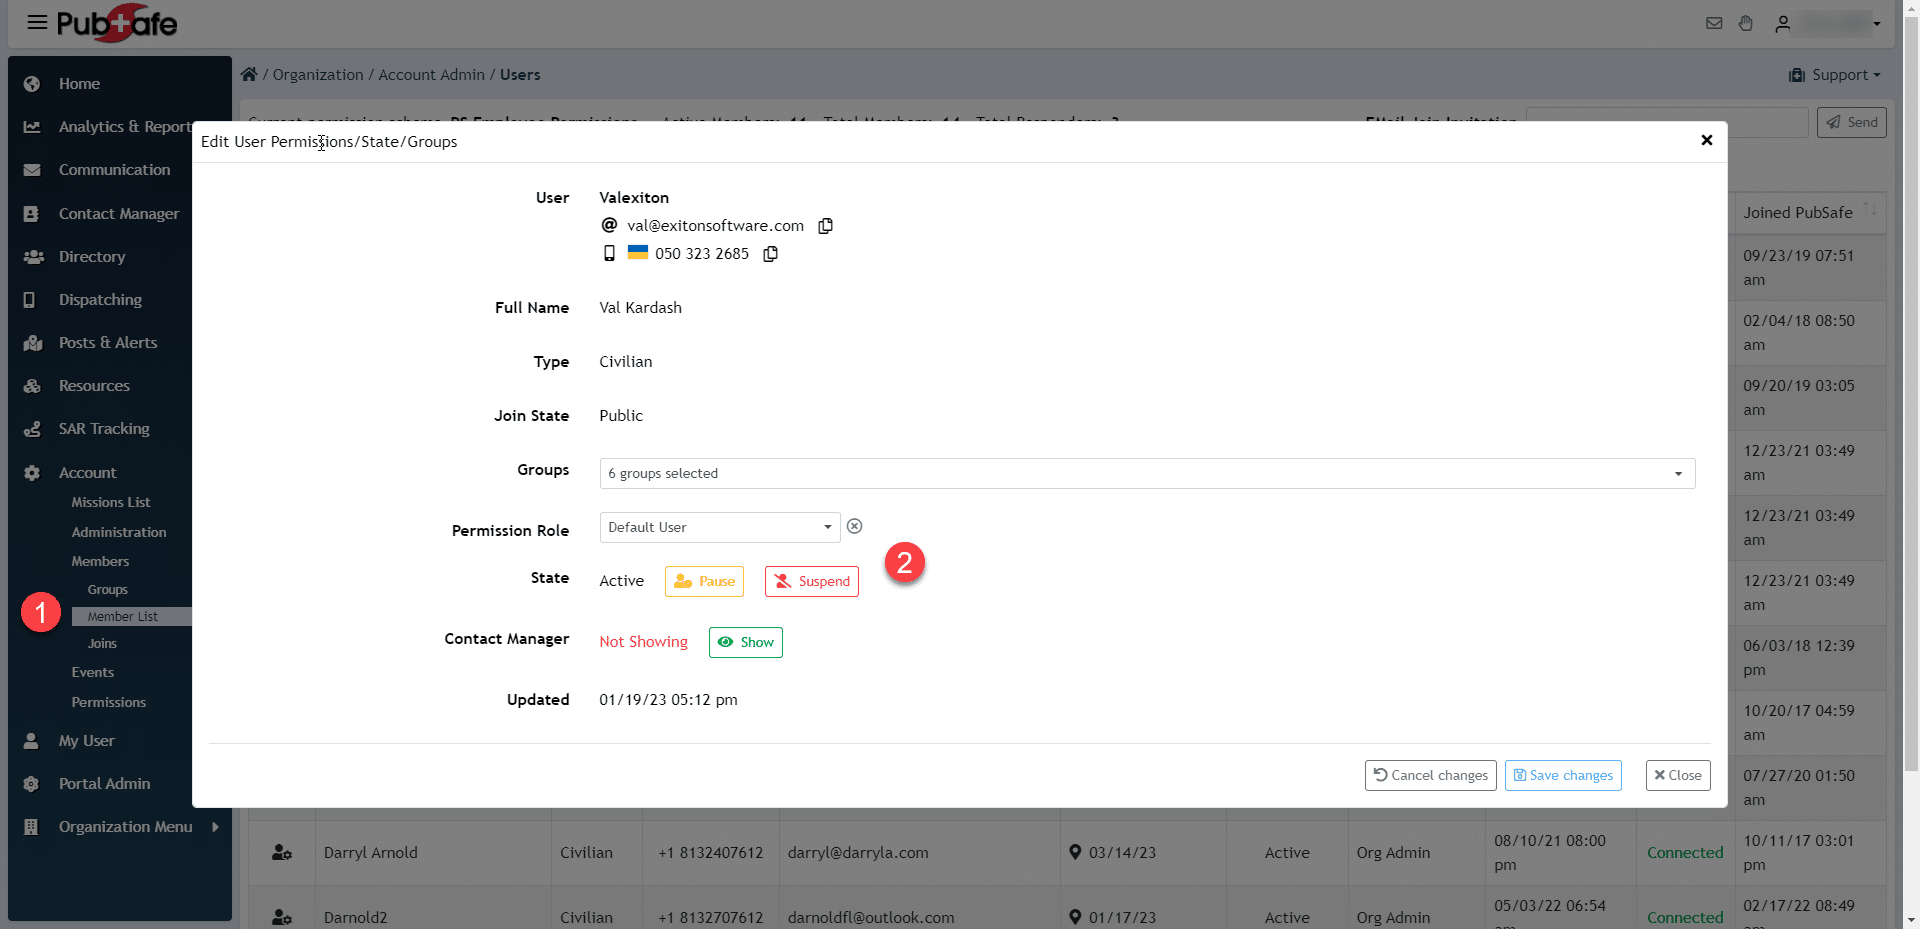
Configure Members
Assign a role to new members and select the other appropriate options. It is a good idea to have several Admin roles. Each role provides access to different areas and features of the portal.
Image 4
Step 6 – Selecting and Changing an Organization
Members of organizations can choose to affiliate with an organization by making a selection in the My Organization list. Options are provided for a user to disconnect from an organization or change between organizations.
Dispatching in a Responder Role
Users in the Responder role with Mission Ready status (image 6), can be contacted to provide assistance to others. A PubSafe Plus user can be assigned to handle a help request but are not part of the member feature set. PubSafe Pro users that are members of an organization can also be dispatched. These users have more features available. Go to our knowledge base to read about the various permission levels and permissions.
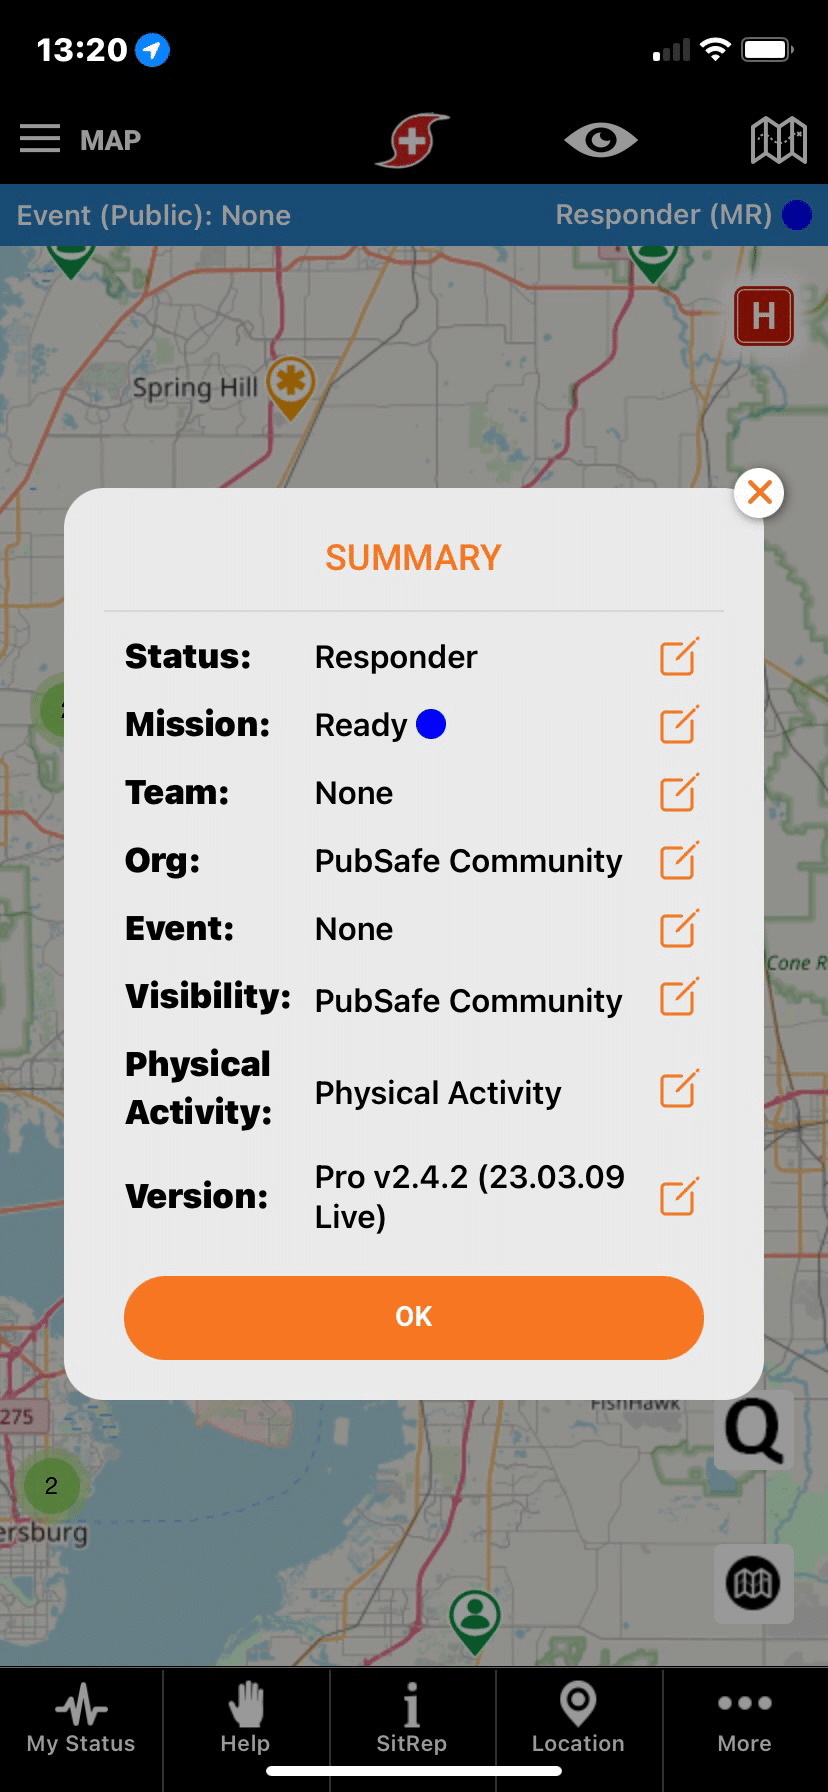
You can review your selections each time you login on the Summary window (image 7).


